
Understanding avalanche conditions during winter mountaineering is an important part of safe climbing. Learn about conducting snow pit tests, pregame research and avalanche survival practices.

Technical Definition of an Avalanche
Simply put, an avalanche is when a massive amount of snow is displaced from its slope and barrels down to the closest relatively level area. The snow is displaced when one of the layers of snow is experiencing a weak area. When this area breaks loose, all of the snow above it also comes loose and slides down. Generally, a slope is usually at a 30-45° angle when an avalanche occurs.
In many cases, avalanches are triggers by climbing, skiing and walking parties unintentionally. The key to avoiding being caught in an avalanche is understanding how they form, identifying when the conditions are optimal for them and testing suspected areas for weak layers.
Types of Avalanches
When avalanches occur, they will either be a powder avalanche, slab or wet avalanche. Each has its own characteristics and factors that can contribute to its occurrence.
Powder Avalanche
 A power avalanche usually occurs from a singular point and continues to accumulate snow as it descends down the slope.
This type of avalanche is produced from loose snow that is too heavy to settle and is often caused by heavy snowfall of one-inch per hour or more.
A powder Avalanche can travel between 62 and 186 miles per hour (100kph-300kph)
Slab Avalanche
 A slab avalanche occurs when a slab of the snowpack, that is generally well-bonded, slides off of a lower layer of snow.
It is identified by a clear break line at the top of the area of displaced snow. It often slides off whole, but it can break apart during the fall.
Slab avalanches usually leave behind large slabs of the snowpack at the bottom of the event area.
Within slab avalanches are two categories, full-depth avalanches and surface avalanches. Surface avalanches only displace surface areas of the snowpack, leaving behind other layers of snow.
 However, full-depth avalanches displace the entire snowpack from its base that meets the rockface.
It leaves behind a bare patch of soil or rock, whichever encompasses the geology surface of the mountain.
We’ll discuss the types of conditions that usually produce this kind of avalanche further down in this article. But in short, these kinds of avalanches occur when there are no anchors to tie the base layer of snow down.
Wet Avalanche
A wet avalanche is defined depending on its moisture content. These occur when a warm spell causes snow to become heavier as it transforms into water. Wet avalanches are often easier to predict based on recent weather conditions.
Factors for Avalanche Conditions
As mentioned above, the optimal slope area for an avalanche is between 30° and 45°. While avalanches can occur whenever there is snow on the ground, it does not necessarily have to be snowing for an avalanche to occur.
The factors that affect avalanche conditions are temperature fluctuation, wind effects, snowfall and rain.

Temperature Fluctuations
The way temperature fluctuations affect avalanches is through melt-freeze metamorphism. This is when the snowpack becomes wet and goes through a cycle process of melting during the day and freezing throughout the night due to the changes in weather.
This process causes some evaporation in the snowpack, leaving behind grains of snow referred to as corn snow.
Wind Effects
Wind will always redistribute snow, even on days when the wind level is low. It is similar to how the wind disperses sand in the desert. The wind has a tendency of distributing snow over lee slopes, creating cornices. Over time, these get weighed down and can collapse causing an avalanche.
Heavy Snowfall
When heavy snowfall occurs, avalanches are an almost imminent threat. The weight of the new snow and the difference in its consistency can cause the newer layers to break free from their common bottom layer. Most avalanches occur after heavy snowfall.
Rain
The factor of rain is a wildcard. It can both destabilize a snowpack by lubricating the bottom layer, facilitating the upper layers to slide off; or it can stabilize it through the process of melt-freeze metamorphism.
Can you predict an avalanche?
No one can 100% predict an avalanche, but there are ways to predict the presence of the environment that causes them. When predicting avalanche conditions, you should start your research at home.
Once on-site, double-check your predictions against your first impressions of the valley. Finally, while on your climb, do some tests to check the conditions against your research.
Avalanche Research Before Your Trip
Before you leave your home for your trip, you should begin your research. Begin by studying the previous day’s weather. Find out whether there was snowfall, how much and check that against the current day’s weather.
With this information, you’ll be able to tell if the snow may have been redistributed by wind or if it will thaw.
First Impressions of Conditions
Your first impressions of the conditions on the mountain are important. Take a long gaze beyond into the distance. Ask yourself if you see any disturbances on the slopes that could have been caused by avalanche activity.
Take note of the wind direction and watch for new levels of snow. Keep in mind that .8 inches of snow per hour can cause unstable conditions. An easy way to tell if snow is new is if it’s very light, like drift snow.
Test Conditions for Avalanche Possibilities
Once you’re on your climbing journey, test the environment for avalanche-prone conditions. Check the wind direction against your current weather forecast. Any changes could be caused by local weather (weather produced by the mountain itself).
Scan the area for evidence of characteristics like sastrugi and cornices. These will help you gauge the previous wind direction.
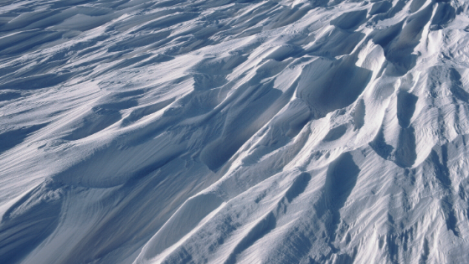
Sastrugi, parallel sharp ridges of snow caused by wind.
As you walk, check the snow beneath your feet for changes in consistency. Cracking at the surface can indicate a slab below. Taken into consideration with the rest of your data, you may be able to judge whether the slab has the possibility of coming loose.
Identifying Avalanche-Prone Slopes
As we mentioned before, most slab avalanches occur on slopes between 30 and 45°. Climbers can choose a route that avoids slopes in this category, but this kind of route can turn out to be longer and more tedious.
Identify the type of surface you’re traveling on. Flat surfaces can produce full-depth avalanches where the entire snowpack dislodges from the rocky mountainside or its soil. This kind of avalanche leaves behind only the natural rockface. However, areas that are covered with large boulders or trees can anchor the base layer. But, surface avalanches can still occur.
Convex slopes always contend with tension fractures and depending on the mountain face, avalanches are based on the seasons.
North Faces
The north faces of mountains are the princes of mountaineering. These faces receive little sun, thus they are colder. Avalanche probabilities are extended by this. But, north faces also produce some of the best climbing environments.
South Faces
The south faces of mountains are inherently warmer, but that allows for the development of thin crusts, which lead to larger probabilities of weak layers.
East Faces
Generally, the east faces of mountains are colder in the mornings and tend to melt slowly.
West Faces
However, west-facing mountainsides are warmer in the afternoons. This produces faster melting snowpacks and wet avalanches.
Cornices
Cornices are produced by wind drifting snow to the edge of ridges. They can extend very far from the ridge and climbers should avoid climbing below them during times when thawing is possible. Also, avoid them up to 48 hours after a snow storm. They can be as treacherous as seracs.
Testing Avalanche Slopes
Conduct these simple tests to determine if the area you will be climbing in may be dangerous.
Dig Snow Pits
During your walk, dig snow pits in areas with similar slopes to the ones you will be climbing through. Smooth your hand over the walls of the pit to feel for changes in the consistency of the layers.
If you find layers that include air spaces or ice and loose grains, it may be a dangerous undertaking. Also watch for soft layers where a fist can penetrate easily, layers of different hardness, excessive wetness or faceted crystals.
Conduct a Shovel Test
The shovel test is a method of testing the different layers present in the snow, but it requires an extensive level of experience to really gauge the results correctly. Using an avalanche shovel, cut a block-shaped column in the snow. Dig your shovel into the backside of the block and pull toward yourself at the angle of the slope. Do not attempt to remove the snow in a lever-like manner.
You are trying to gauge how easily the snow block comes loose from its preceding layer from easy, moderate to hard. Each time a piece of your column comes loose, you’ll reveal a new layer of snow where you can identify things like weaknesses, moisture, ice crystals and more.
We recommend the Backcountry Access Tracker S Rescue Package. It’s a kit that includes everything you need for avalanche testing, an avalanche beacon, probe and shovel.

Can you survive an avalanche?
Before even discussing this, the fact is that most people who are caught in an avalanche do not survive. Avalanches have been the cause of many notable deaths in mountaineering including the 2017 death of Alberto Zerain and the 2019 deaths of David Lama, Jess Roskelley and Hansjörg Auer.
That being said, there are ways to increase your chances of survival. The optimal chances of survival rest on making an air pocket and being close to the surface.
Staying Close to the Surface During an Avalanche
Being able to stay close to the surface is a lot to ask when you’re being swept away, but it’s imperative. As with all things in mountaineering, climbers need to be able to have the process of quick thinking down packed.
If you’re caught in an avalanche, you can attempt these things in order to try and stay close to the surface when you land.
Self Arrest
The best way to try to stay close to the surface is to delay your descent with the avalanche by performing a self-arrest. Plunge your ice axe into the snow and hold on as long as you can. This allows more snow to fall below your eventual landing zone.
Stay on Top of a Slab
This is a bit tricky, but if you notice that the snowpack is relatively hard, try to remain on top of a slab. It’s risky and there are no guarantees of survival, but if it works properly, you’ll ride the slab before it breaks at the bottom. Or, it will help you land closer to the surface at least.
Make Swimming Motions
This hasn’t been proven, but some people have claimed that making swimming motions assists in distributing snow beneath the falling climber.
When the Avalanche Slows
When you feel the avalanche slowing, make every effort to try and move toward the surface. This will help you move without as much resistance from fast-moving snow.
Roll
Sometimes, the best way to combat something is to mimic it. When falling, attempt to roll (like a log) in the same direction the snow is falling. This movement may help you roll off debris and land closer to the surface.
Making an Air Pocket
When you land, your chances of survival are not very good if you don’t have an air pocket. When you feel the avalanche beginning its end, take a deep breath and hold it. Your chest cavity will expand, and when you land, you’ll have that space to breathe.
Otherwise, the snow will pack your torso in place and breathing will become very, very difficult. Make all attempts to remove snow from your face and remain calm. Panicking wastes your air.
Yell to Alert Companions
Always get into the habit of yelling whenever something occurs to you on the mountain. If you can, yell what is happening. Your companions will have a better understanding of how to help you when they’ve understood what’s going on before coming to your assistance.
Practice this at home when you cut yourself, fall or get hurt. “ah, I’ve cut my finger!” it sounds stupid, but your helpers will get in the proper mental state to help you when they get to you.
ALWAYS SHOUT when you see an avalanche coming to alert your companions of your situation. The time spent trapped in an avalanche can contribute to developing conditions like frostbite or hypothermia. Time is of the essence.
Related Articles:
 Signs of High-Altitude Sickness, Treatment and Prevention
Here’s a list of the most common high altitude sicknesses and expedition illnesses. Being aware of high altitude sicknesses and expedition illnesses can mean the difference between life and death on the mountain.

Hyperbaric Chamber | Image Credit: Biswarup Ganguly | License
Short Definitions for High-Altitude Sicknesses
Here’s a rundown of some common high-altitude sicknesses and what to do if you come across them. Consider this High-Altitude Sickness Lesson 101.
If you enjoyed this article, consider becoming a patron to Base Camp Magazine to help us keep bringing you content like this. Tiers start at just $3.

Some Sources:
- “Natural Hazards: Avalanches.” Natural Disasters Association.
- “Avalanches, Part 2: Snow Tests: REI Expert Advice.” REI, Recreational Equipment, Inc.
- National Aeronautics and Space Administration. “Snow Pit Procedures.” NASA. PDF.
- Rock and Ice. “Climb Safe: Avalanche Safety.” Rock and Ice, Rock and Ice Magazine, 17 May 2017.
